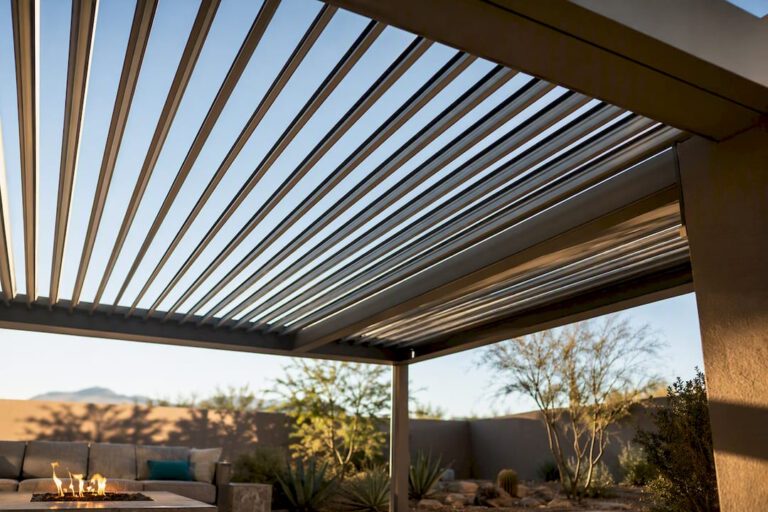
Start with a recommended clearance distance from your house for a wood-burning fire pit, with some local codes allowing closer placement for gas or propane units depending on manufacturer specs and local fire marshal guidelines. The variables that shift that number are overhead clearance, seating comfort, and permit requirements. NFPA guidance and FEMA’s outdoor fire safety recommendations form the baseline every homeowner should check before breaking ground, and after 24 years building outdoor living spaces across the Phoenix area, Unique Companies has seen how often those numbers get overlooked.
TL;DR:
- Fire pits must be placed at least 10 to 25 feet from structures, depending on fuel type and local codes, with gas units allowed closer if specs are met.
- Overhead clearance should be a minimum of 21 feet for wood-burning fire pits, measured from the flame to the lowest overhead structure or branch.
- Dry landscaping, mulch beds, and leaf litter require a buffer of several feet to prevent ember ignition, especially during dry, windy seasons.
- Proper site testing involves marking the footprint, checking wind directions, and reviewing measurements with a tape measure before concrete is poured.
- Safety equipment such as fire extinguishers, hoses, and shutoff valves should be close to the fire pit and checked routinely for quick response.
Table of Contents
- Fire Pit Placement: How Far From the House Is Safe?
- Does Fuel Type Change Where You Can Put a Fire Pit?
- What’s the Overhead Clearance for a Fire Pit?
- How Do You Lay Out Seating Around a Fire Pit?
- Do You Need a Permit for a Fire Pit?
- Fire Pit Placement Checklist Before You Build
- What Fire Safety Equipment Should Sit Near the Fire Pit?
- How Do Seasons and Weather Affect Fire Pit Placement?
- How Close Is Too Close to Dry Grass or Landscaping?
- What Are the Safest Lighting and Extinguishing Habits?
- What Homeowners Get Wrong About Fire Pit Placement
- Let Unique Companies Handle Your Fire Feature Design and Permits
- Where to Verify Fire Pit Safety and Code Requirements
- Sources
Fire Pit Placement: How Far From the House Is Safe?
A common baseline clearance cited by NFPA and the International Fire Code for fire pits from structures, trees, and combustible materials is a safe distance that accounts for wind gusts, wandering embers, and radiant heat from wood fires. That number isn’t arbitrary. It accounts for wind gusts, wandering embers, and the radiant heat a wood fire throws off once it’s built up.
FEMA’s outdoor fire safety guidance sets a slightly different floor: at least 10 feet between a fire pit, chimney, or outdoor fireplace and your home or anything combustible, with campfires kept 25 feet from tents and shrubs. The gap between “10 feet minimum” and “25 feet ideal” is where fuel type, local code, and common sense come into play.
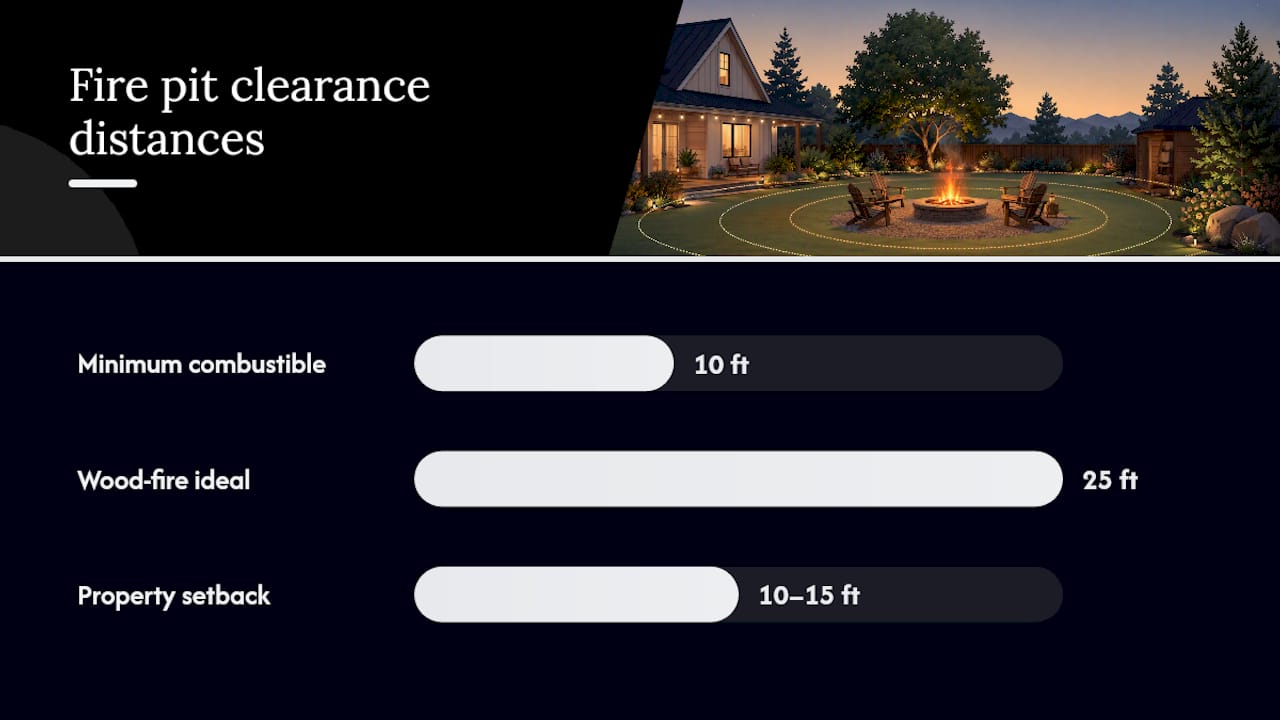
Gas and propane pits change the math. Because they don’t throw sparks, NFPA’s wildfire prevention guidance notes many jurisdictions allow closer placement, often in the 10 to 15 foot range, provided the unit meets manufacturer clearance specs. Those specs matter more than the rule of thumb. A gas fire table’s owner’s manual might call for just 3 feet of side clearance from a wall, but your local building department can still require more if the appliance sits near a covered patio or vinyl siding.
Here’s what actually counts as a combustible you need to measure from:
- Wood siding, wood fences, and untreated decking
- Dry landscaping, mulch beds, and overhanging shrubs
- Parked vehicles, propane tanks, and gas meters
- Sheds, detached garages, and wooden play structures
- Vinyl siding and composite decking, both of which soften or warp under radiant heat well before they ignite
Clearance should be measured from the outer edge of the fire pit rather than its center to ensure adequate distance from combustible materials. Also account for roof overhangs and eaves. A pit placed 12 feet from your foundation wall might only be 9 feet from the edge of a 3 foot roof overhang, and embers rising on a draft don’t care which measurement you used.
Property line setbacks add another layer most homeowners forget. Many municipalities require a separate setback, often 10 to 15 feet, from any fire feature to the neighboring property line, independent of the structure clearance. If your lot is narrow, this can eliminate more usable yard than the house clearance rule does. Check both numbers before you commit to a spot, because rotating the layout 10 degrees later is a lot easier than moving a poured concrete pad.
Does Fuel Type Change Where You Can Put a Fire Pit?
Fuel type is often the single biggest lever homeowners have over placement, because it directly changes how far you legally and safely need to be from everything else in your yard.
Wood-burning fire pits produce sparks and floating embers that can travel well beyond the flame itself, especially in dry conditions or a stiff breeze. That’s why they carry the more restrictive clearance guidance, with 25 feet from structures cited repeatedly across fire-safety resources, plus a metal spark screen recommended anytime the pit is burning. Wood fires also need a wider buffer from dry grass, leaf litter, and low branches, since a single ember landing in the wrong spot can smolder for hours before anyone notices.
Propane and natural gas pits burn cleaner, with no embers and far less unpredictable flame behavior. That’s the tradeoff that lets many jurisdictions permit them closer to the house, sometimes 10 to 15 feet, though the manufacturer’s clearance rating always overrides the general guideline if it’s stricter. Gas pits also allow tighter seating layouts, since guests aren’t dodging sparks.
Wood-burning fire pits typically require a wider safety buffer and use of spark screens, while gas and propane units require fuel supply considerations that may affect placement.
- Chimineas and other enclosed burners direct heat and sparks upward through a chimney opening, which changes overhead clearance needs more than horizontal ones
- Seating can sit closer to a gas flame table (often 15 to 24 inches) than to an open wood fire, which typically wants 7 feet of open ground before the first chair
If your yard is tight or borders a fence, gas is usually the more forgiving choice for placement. If you want the crackle and larger flame of a wood fire, plan for the extra footprint from the start.
What’s the Overhead Clearance for a Fire Pit?
Horizontal distance gets most of the attention, but vertical clearance causes just as many placement mistakes. NFPA-based guidance commonly recommends 21 feet of overhead clearance for wood-burning fires, measured straight up from the flame to the lowest branch, wire, or structure above it. Gas units generally need less, since flame height is controlled and predictable, but manufacturer literature still sets the real number.
Measure to the lowest point of any pergola rafter, tree canopy, or roof eave directly above the pit location, not just the nearest one. Overhanging branches move in wind, and a limb that looks 22 feet up on a calm day can dip several feet lower in a gust.
Unsafe overhead materials include untreated wood pergola slats, retractable fabric awnings, and anything with a synthetic weave, since those ignite or melt at temperatures a wood fire reaches easily. If a covered structure is unavoidable, a gas fire table with a controlled, lower flame height is almost always the safer fit than a wood pit underneath it.
On the ground, non-combustible bases matter as much as what’s overhead:
- Poured concrete, natural stone, or compacted gravel handle radiant heat without degrading
- Existing wood decks need a dedicated heat shield, fire-rated mat, or a raised fire pit stand that keeps flame contact off the deck surface entirely
- Kiln-fired pavers hold up to repeated high heat; standard concrete pavers that haven’t been kiln-fired can crack or spall over time
- Polymeric sand in paver joints near the fire ring can soften under prolonged heat, so a stone or metal border around the immediate flame zone protects the joints beyond it
Pro Tip: Before you pour a permanent pad, set the fire pit on its planned spot for a few evenings and watch where the heat actually radiates. Homeowners are frequently surprised by how far warmth travels sideways on a still night, which is a cheap way to catch a bad layout before concrete makes it permanent.
How Do You Lay Out Seating Around a Fire Pit?
Comfortable fire pit seating follows a fairly consistent formula, and it starts with knowing your fuel type. Wood-burning pits generally call for around 7 feet of open ground before the first chair, since radiant heat and occasional pops of sparks both need room. Gas fire tables run cooler at the perimeter, so seating can sit as close as 15 to 24 inches from the unit’s edge without discomfort.
- Set the pit first, then build outward in rings. The fire pit anchors the center; the next ring is clear ground; seating comes after that; a walkway of at least 3 to 4 feet frames the outside edge for safe circulation.
- Size the open ring to your pit diameter. A 3 to 4.5 foot interior pit, the range recommended for small gatherings of two to four people, typically needs a clear radius matching the seating distance for its fuel type.
- Check prevailing wind on more than one evening. Wind direction shifts with the season, and a spot that’s smoke-free in June can blow straight into a covered patio by October. Walk the site at dusk, when many people actually use their fire pit, and note which way smoke drifts.
- Keep the pit downwind of doors, windows, and covered seating. Smoke settling into an open kitchen or bedroom window ruins an otherwise well-placed fire pit fast.
- Clear mulch, dry leaves, and stacked firewood from the surrounding zone. A metal spark screen adds a real layer of ember control on windy nights, and firewood storage belongs well outside the clearance radius, not stacked against the pit for convenience.
Furniture choice affects all of this too. Low-profile chairs and built-in seating walls hold heat differently than movable Adirondack chairs, and outdoor seating layouts designed specifically for fire pit comfort can help you avoid the common mistake of crowding too many chairs into too little clear ground.
Do You Need a Permit for a Fire Pit?
Fire pit placement runs through four overlapping layers of authority, and skipping any one of them is how homeowners end up removing a finished installation. The baseline comes from NFPA and the International Fire Code, which most state and county regulations build on. Above that sits your municipal fire code, then finally your HOA, if you have one, which can be stricter than every layer beneath it.
Permit triggers follow a fairly predictable pattern. A small, portable wood or propane pit under roughly 3 feet in diameter generally falls under the “recreational fire” classification that many jurisdictions allow without a permit. Cross into permanent masonry construction, a gas line connection, or an installation built into a deck, and you’re almost always looking at a permit and an inspection.
Here’s who to call and what to ask before you finalize placement:
- Local fire marshal: ask about recreational fire rules, current burn bans, and any seasonal restrictions tied to drought conditions
- Building department: ask about permit requirements for gas line connections, permanent masonry, or any fire feature built into a deck or patio structure
- HOA architectural committee: ask for design guidelines, required documentation, and whether fire features need separate approval from general landscaping changes
- Utility locate service: confirm underground gas and electrical lines before any excavation for a gas connection or footing
Seasonal burn bans deserve their own line of attention, especially in drought-prone regions where a legal wood fire in April can become a citation-worthy fire in August. Wildfire-interface zones often carry year-round restrictions on open flame regardless of season. None of this shows up by guessing. A five-minute call to your local AHJ before you finalize a spot beats a stop-work order after the concrete has cured.
Fire Pit Placement Checklist Before You Build
Walk the actual site with a tape measure before committing to anything permanent. A plan that looks fine on paper can reveal a problem the moment you stand where the fire pit will actually go.
- Mark the full footprint on the ground. Use stakes or spray chalk to outline the fire pit, the clear ring, the seating zone, and the walkway, then measure from the pit’s edge to the nearest wall, fence, and property line.
- Confirm vertical clearance and test the wind. Look straight up for branches, wires, or roof overhangs, and check wind direction at the time of day you’ll actually use the space.
- Match fuel type to your surface and base. Wood needs a wider ember buffer and a non-combustible base; gas needs proximity to a fuel source and manufacturer-rated clearances.
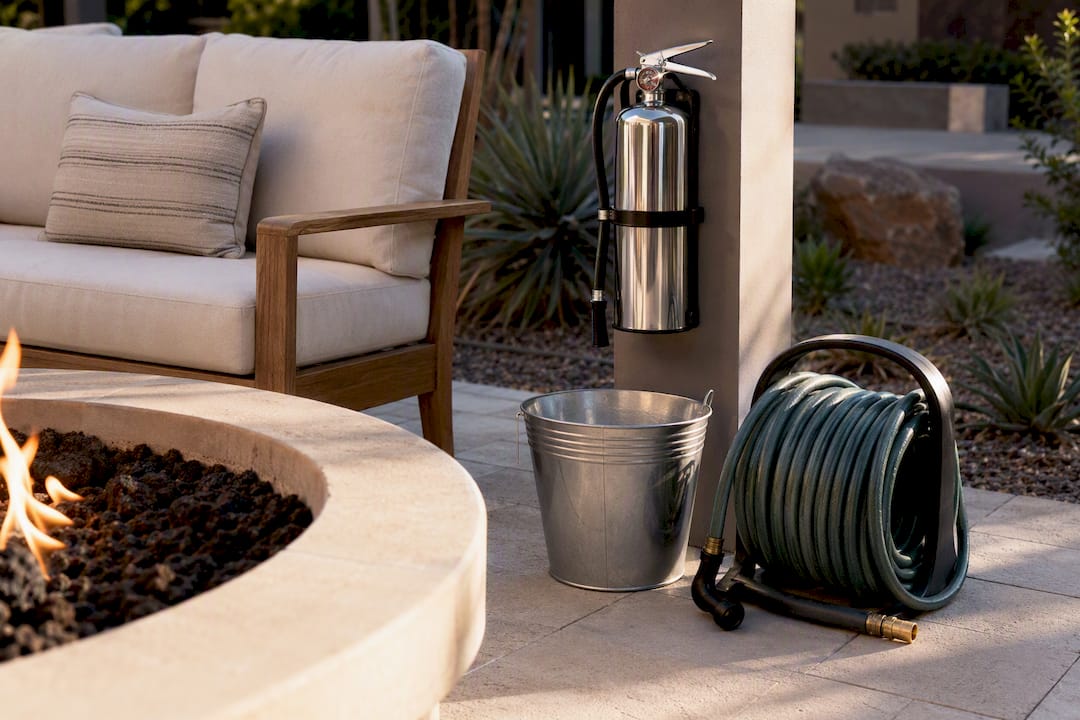
- Stage safety equipment at the site. A garden hose, a bucket of sand or water, and a fire extinguisher rated for the fuel type should all have a designated, accessible spot near the seating area, not stored in the garage.
- Call your local AHJ and HOA before you dig. Confirm permit requirements, get any required documentation started, and schedule an inspection if your installation involves gas lines or permanent construction.
Pro Tip: Take photos of the marked footprint from your favorite outdoor seating spot and from your kitchen window. It’s the fastest way to catch a sightline or smoke-drift problem before it’s poured in concrete.
What Fire Safety Equipment Should Sit Near the Fire Pit?
A fire pit without nearby suppression tools is a bet on nothing going wrong, and that bet fails often enough to matter. FEMA’s guidance on outdoor fire safety recommends a metal spark screen for wood fires and close supervision anytime a flame is burning, but the equipment list should go further than that.
Keep a charged garden hose within reach of the seating area, not coiled up on the far side of the house. A five-gallon bucket of water or sand works as a low-tech backup when a hose isn’t practical, especially for pits set farther from an outdoor spigot. A fire extinguisher rated for the fuel type in use, Class A for wood, Class B or a multipurpose ABC unit for gas and propane, belongs on a wall mount or stand within a few steps of the pit, not stored inside.
For gas and propane units, a shutoff valve within arm’s reach lets you kill the fuel supply instantly if a hose or regulator fails. Keep it clear of furniture and decor so nobody has to search for it in a hurry. A basic fire blanket, often overlooked, handles small clothing or debris fires faster than water and costs less than most patio cushions.
None of this equipment needs to be visible or decorative. It just needs to be exactly where everyone knows to find it, every time the fire pit is lit.
How Do Seasons and Weather Affect Fire Pit Placement?
A spot that works beautifully in November can become a liability in July, and Arizona’s dry season is a clear example of why seasonal thinking matters as much as the initial layout.
Wind patterns shift with the seasons in most regions, which means the “downwind of the house” placement you tested in spring might blow smoke straight into a window by late summer. Walk your site during more than one season if you can, or at least check historical wind data for your area before finalizing a permanent installation.
Drought conditions raise the stakes on every clearance number discussed so far. Dry vegetation ignites faster and burns hotter, and many municipalities issue temporary burn bans specifically tied to drought status or red flag warnings. A wood fire pit that’s fully compliant on a humid June evening can become illegal to light during a dry, windy stretch in August, even at the same address.
Cold-weather use brings a different set of considerations. Frost heave can shift a poured concrete pad over several winters in colder climates, gradually changing the clearance measurements you took at installation. In hotter climates like Phoenix, summer heat alone can make anything closer than a generous seating distance uncomfortable regardless of the fire, which is worth factoring into layout before you commit to a location that only works half the year.
How Close Is Too Close to Dry Grass or Landscaping?
Dry grass, mulch beds, and leaf litter are some of the most overlooked ignition risks in fire pit placement, largely because they don’t look dangerous the way a wood fence does.
A single ember landing in dry mulch can smolder unnoticed for hours before catching, and by the time it’s visible, it’s often already spread into surrounding groundcover. Keep a cleared buffer of bare ground, gravel, or stone, ideally several feet in every direction, between the fire pit’s ember radius and any mulch bed, dry lawn, or leaf accumulation. This buffer matters most in late summer and fall, when fallen leaves and cured grass turn into ready fuel.
Landscaping choices around the fire pit area carry weight too. Low-growing groundcovers and hardscape materials like gravel or pavers hold up far better near a fire feature than bark mulch or ornamental grasses, which can ignite quickly in dry, windy conditions. If your yard backs onto open space, a greenbelt, or wildland vegetation, treat that edge as an extended clearance zone rather than a design feature, since ember drift in a strong wind can travel well past your property line.
Irrigation matters here too. A drip-irrigated planting bed near the fire pit stays green and fire-resistant longer into the dry season than an unwatered one, which is a simple, low-cost way to build in some margin without changing your layout at all.
What Are the Safest Lighting and Extinguishing Habits?
Good placement only pays off if lighting and extinguishing habits match it. A well-sited fire pit lit carelessly still creates risk the layout was designed to avoid.
Light wood fires with dry kindling and small logs, never with gasoline or other accelerants, which cause flare-ups that can exceed the clearance distances calculated for a normal fire. For gas and propane units, always check hose connections and the shutoff valve before igniting, and never light a gas fire pit near a leak you haven’t already addressed.
Extinguishing matters as much as lighting. Wood fires need water applied gradually, stirred into the ash bed, and checked again after a few minutes, since embers can reignite hours later if they’re only partially doused. Never leave a wood fire to burn out unattended overnight; that’s how yard fires start well after everyone has gone inside. Gas and propane units should be shut off at the valve, not just the burner control, and left to cool before any cover is placed over them.
A few habits worth building into every session, regardless of fuel type: check wind conditions before lighting, keep the extinguishing equipment discussed earlier within reach the entire time the fire burns, and do a final visual check of the pit and surrounding ground before heading inside. Placement gets a fire pit most of the way to safe. Consistent habits finish the job.
What Homeowners Get Wrong About Fire Pit Placement
The mistake I see most often isn’t a homeowner ignoring the clearance rules. It’s a homeowner following the clearance rules perfectly and still ending up with a spot nobody wants to sit in.
Codes tell you the minimum safe distance from a wall or a fence. They say nothing about whether that spot catches the evening sun in your eyes, sits in the flight path of every mosquito in the yard, or puts your back to the only view worth looking at. Safety compliance is the floor, not the design. Too many backyard fire pits end up technically legal and functionally abandoned within a year because the placement process stopped at “does this meet code” instead of continuing to “does this actually work for how we live.”
The other underestimated factor is how much a fire pit’s footprint grows once you add real seating and a walkway. A homeowner measures 25 feet from the house, feels confident, and then discovers the seating ring and circulation space needed around a wood-burning pit eat up nearly a third of their usable yard. That’s not a code problem. It’s a layout problem, and it’s exactly why professional designers mark the entire footprint on-site, seating and walkways included, before anyone pours concrete.
If there’s one habit worth adopting from how Unique Companies approaches these projects, it’s testing the site before committing to it. Sit where the chairs will go. Watch the smoke on a real evening. The rule of thumb gets you a legal location. Only sitting there gets you a good one.
— Philipp
Let Unique Companies Handle Your Fire Feature Design and Permits
Working out clearance math, wind patterns, and permit paperwork on your own takes real time, and a mistake at the planning stage often means redoing hardscape after it’s already poured. Unique Companies builds custom fire features as part of full backyard designs across Phoenix, Scottsdale, Chandler, and Queen Creek, handling the design, permitting, and construction in-house so the clearance calculations, base materials, and inspection requirements are settled before a single stone gets set.

The company’s design process uses 3D visualization to test sightlines, smoke direction, and seating flow before construction starts, which catches the kind of layout problems homeowners usually discover only after the concrete has cured. That in-house permitting support also means gas line connections and permanent masonry installations move through inspection without the back-and-forth that trips up a lot of DIY projects. Whether you’re adding a fire feature to an existing backyard or planning fire feature installation alongside a larger outdoor kitchen or pool project, a site visit is the fastest way to find out what your yard can actually support. Reach out to schedule a consultation and see how the layout could look before anything gets built.
Where to Verify Fire Pit Safety and Code Requirements
The clearance numbers and safety practices in this guide draw on established fire-safety authorities, starting with FEMA’s outdoor fire safety guidance and NFPA’s wildfire prevention recommendations for structure and overhead clearance. For construction and sizing specifics, Lowe’s fire pit building guide offers practical detail on bases and dimensions, while HGTV’s fire pit safety rules cover everyday precautions.
None of these substitute for a call to your local fire marshal or building department. Codes vary by jurisdiction, and the authority having jurisdiction over your specific address always has the final say.
Sources
- Outdoor Fire Safety — USFA (FEMA)
- Wildfire prevention tips for fire pits and outdoor fires — NFPA (blog)
- How to build a custom fire pit — Lowe’s